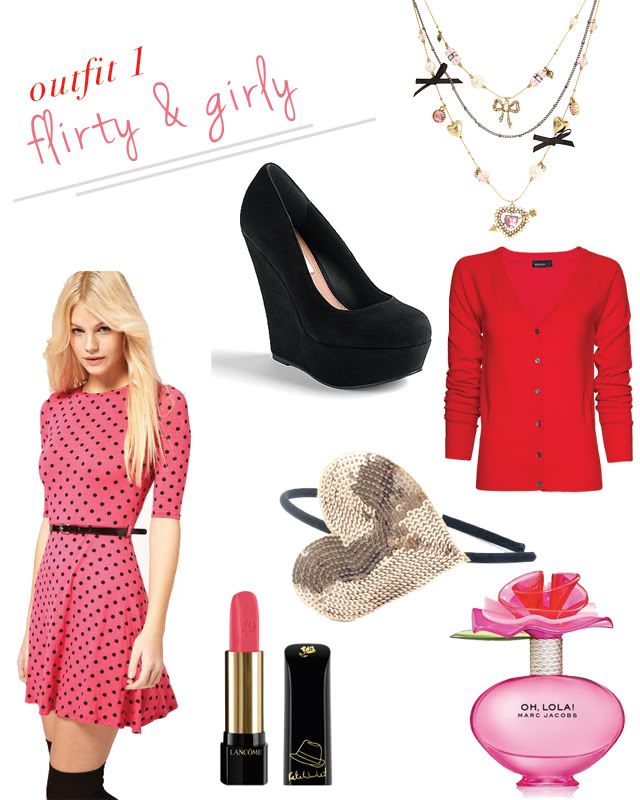
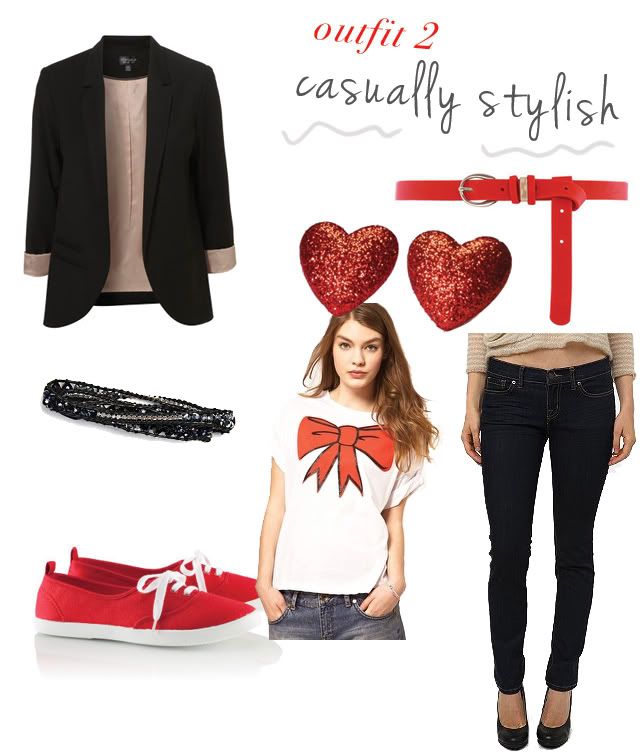
Oh my goodness you guys, did I fall off the face of the earth or what?! I've been gone 10 days but it feels more like a month! How have I been so busy?!
Thank god for awesome people like Lori though! Today she's sharing a super fun makeup tutorial perfect for Valentine's Day! And it's easy too, even a makeup noob like me can do it! (YAY! Bonus points for that!) Be sure to check out more of Lori's blog A Little Slice of Special because she's a stellar gal and I think you'll really like her!
_________________________________________________________________________
Well hi there Lovely Miss Megs' readers!
My name is Lori
and I blog over at A Little Slice of Special where I document my personal style, play with makeup, and talk about anything that makes me giggly or smiley (ok to be fair, I sometimes have a venting post as well). Meg was awesome enough to invite me to write a guest post for her blog and well, to say I was excited would sort of be the understatement of the century! I knew I wanted to write up a beauty post and since it was going to go up around Valentines, I thought I'd do some Valentine's day worthy makeup!
I had seen this photo on pinterest and thought it looked absolutely lovely...it also didn't have a link to anything or explain how to achieve it. So, I've dubbed it the Ombre lip and I tried to figure out how they created it!
(this photo was uploaded by a pinterest user, I've linked to said user[click on the photo above!])
***
So, my attempt didn't come out as great as the inspiration but I also have a sneaking suspicion the photo above was done by a makeup artist...I strongly believe that you don't have to be a makeup artist to have fun and be creative with makeup!
I opted for 2 softer versions: berry and bright pink. I was able to dig through my mountain of lipsticks, glosses, and stains and as you can see in A. below I just played around with layering until I found a series of colors I liked together. I'd say you need 3-4 colors but theoretically you could totally pull this off with 2!
1. The first and probably most important step is to prep your lip. I used Revlon Colorstay clear lip liner all the way around my lips, I like to actually apply the line above my lip (since it's clear) so that I have the full lip surface for the actual color, it still keeps the color on track but doesn't waste lip real estate!!!!
2. I then applied a thick/creamy foundation to my entire lip using my fingers. I used Time Balm foundation, which is available at Sephora. And yes, you look super creepy at this stage. Using foundation, concealer or lip primer creates an even surface upon which to work, it will keep tones consistent and also help your lip color last longer!
3./4. The next step is to apply a nude lipstick (I used Revlon Matte in 01) to your entire bottom lip. Once you're well blended you can go for the first color. I used a lip and cheek stain in a berry color, specifically ... Stila's pomegranate crush lip & cheek stain . Instead of brushing it directly on my lips I used a disposible eye shadow sponge to dab the color on the top center of my bottom lip.
5. At this point I blended the stain out, adding a little bit at a time, as necessary, until I had 3 fairly clear colors happening on my lower lip.
6. The next color I added is a rose cream lip pencil from Buxom. I covered my entire top lip, but didn't worry too much about getting too close to the edge of my top lip since I'd be covering that area with a darker shade anyways. At this point I also added significantly more of the lip stain to the innermost part of my bottom lip (still using the shadow applicator).
7. Here came the really tricky part...especially since it looked horrible before I blended it out. I added NYX Cream lipstick in snow white (a deep berry red) along the top half of my upper lip, again, I didn't worry about getting too close to the edge, I blended out from that point anyways.
8. The next step was to blend. I used the other side of the eye shadow applicator to blend out only the lipstick until it no longer looked harsh
9. Using my e.l.f. Studio Retractable Lip Brush I blended and precisely shaped the outter line of my lip and create a few light placed where I tried to further blend the red with the rose colors on my upper lip.
10. And that's it! The one major thing I would do differently now would be to add a clear gloss over the whole look. My lips are a little dry right now so that might have helped with inner creasing. Another great step would be to prep your lips with a lip scrub... I highly recommend Lush's Mint Julip lip scrub . It's all natural, tastes great, and has oil in it to hydrate your lips as the sugar exfoliates! I have the mint Julip flavor but there are a few others if mint isn't your thing!
A. Creating lip swatches to determine what colors to use
B. NYX Cream Lipstick in Snow White, Buxom lipstick pencil in Rose, Stila Pomegranate crush lip & cheek stain, Revon Matte lipstick in nude (01), Revlon Colorstay Clear Lipliner
Because I felt like I had just sort of gotten the hang of the whole ombre thing I thought I would repeat what I had just done in a series of pinks, I also wanted to try to recreate the effect without a lip stain. My lips certainly looked more moisturized! I applied the lightest pink first, the convertible color in place of the lip stain, the gardinia on the lowest part of my upper lip and topped it with the hot pink.
Colors/Products Used:
(left to right in photo below)
Revlon Matte Lipstick in Pink (02)
NYX Lipstick in Gardenia
Makeup forever #36 Hot Pink
So there you have it, two awesome options for an Ombre Valentines day lip! I'm planning to give this a go if I can get appropriate colors to match whatever I decide to wear (of course I haven't decided yet!) and I'll seal it with Urban Decay's Setting Spray (I have dew me) so it for sure doesn't come off while we're out to eat!!!!
Thanks for reading and I hope you enjoyed!
XoXo (yes-like gossip girl-I swear I really am 26!)
Lori Lynn